How i set up my homelab with 3 nodes
Hello, it just my simple blog writing about how i get started doing my best about homelab.
The Architecture: Why Three ?
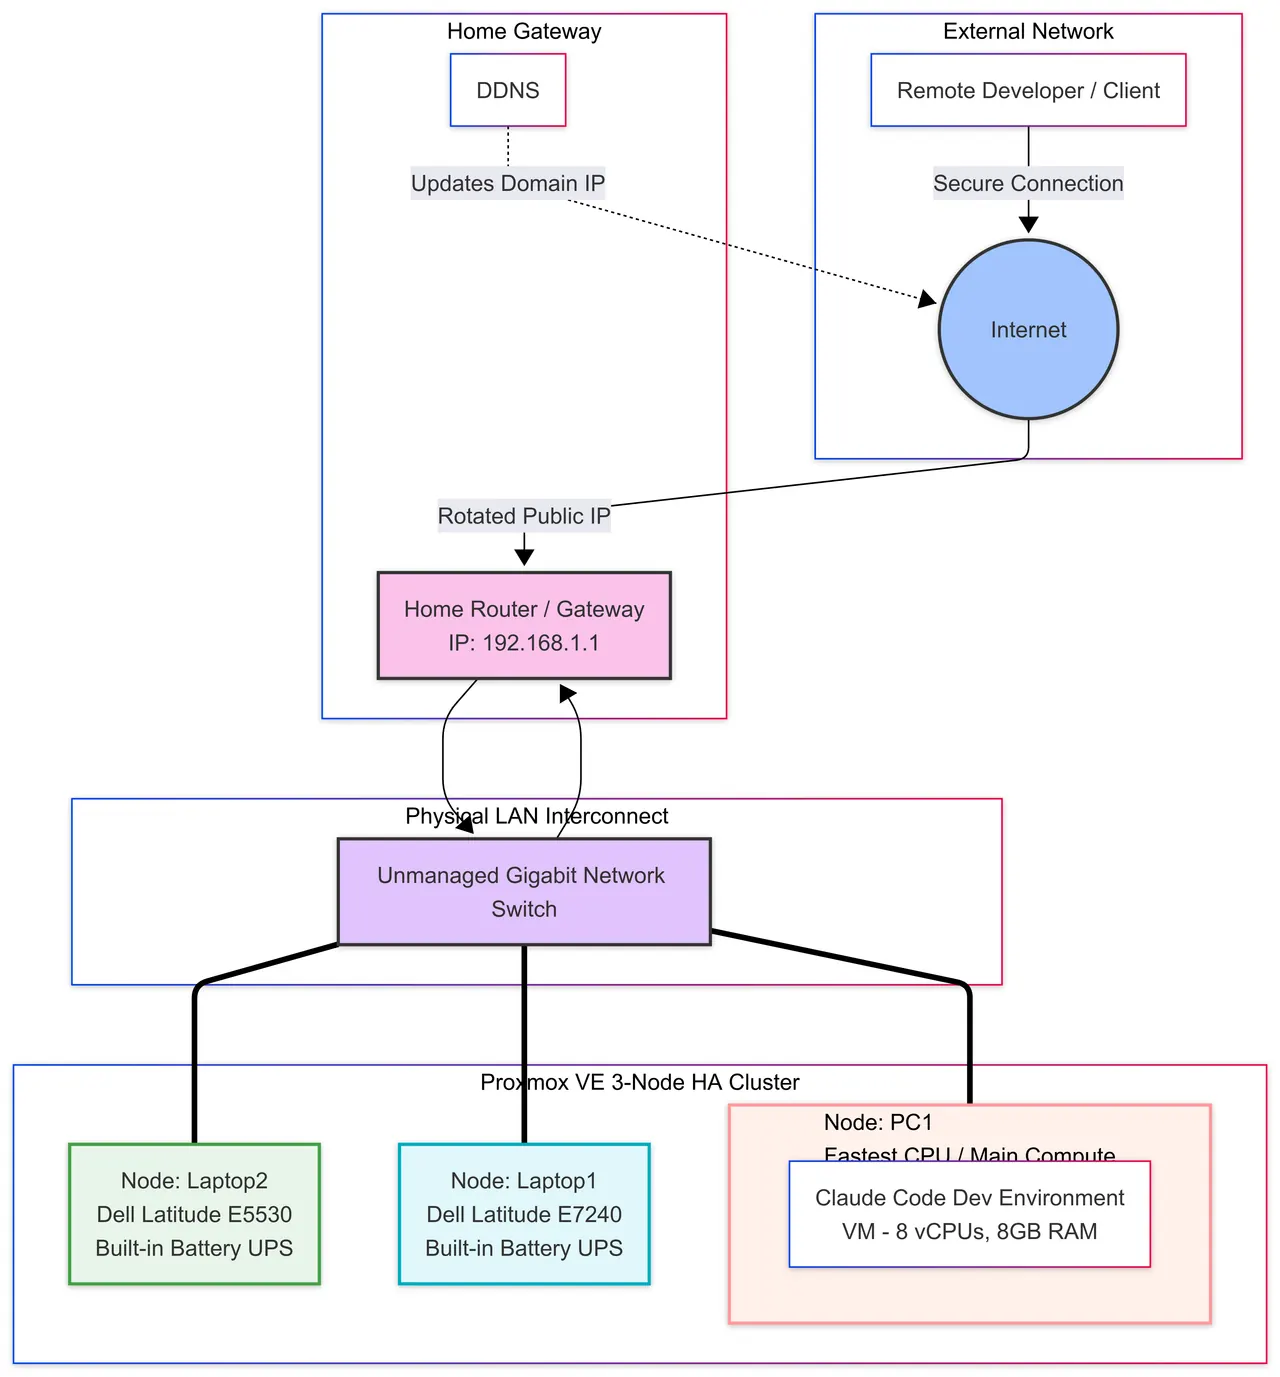
Building a cluster with three nodes is actually the “magic number” for Proxmox High Availability.
Voting system to prevent data corruption. It like your brain have 3 personalities but merging into one, but they have same thinking performance. One died => you still remember everything with others 2.
The cluster uses Corosync for synchronization, which requires incredibly stable, low-latency communication. All three nodes are hardwired to an unmanaged gigabit switch via Ethernet cables, we would never use Wi-Fi here.
Busting the “Supercomputer” Myth
It is a common misconception that clustering machines fuses their CPUs and RAM into one giant resource pool. Instead of sharing hardware microscopically, the Proxmox cluster shares workloads, management (a single web dashboard), and failover resilience.
I fall in that mistake too, first i tryna connect all 3 to make it into one but realistically that kinda impossible because just think about how they gonna communication at CPU speed through LAN?
Defeating Laptop Power Management
Laptops have this one problem: the screen. When you close the lid it suspends. So i need to turn that off, pretty basic, go into /etc/systemd/logind.conf then add these lines
HandleLidSwitch=ignore
HandleLidSwitchExternalPower=ignore
HandleLidSwitchDocked=ignore
Then just update it and you’re done.
For turning off the screen, this is the approach i went with (suggested by an LLM):
In /etc/default/grub:
GRUB_CMDLINE_LINUX_DEFAULT="quiet consoleblank=60 console=tty0 console=ttyS0,115200 "There are 2 things to note here. consoleblank=60 turns off the screen after 60 seconds of no activity, and console=tty0 console=ttyS0,115200 lets me use Xterm.js for copy paste on the terminal, which is way more convenient than the default NoVNC
One Laptop Failed to Update Time
Let name it laptop1. I get it from my cousin, laptop1 experienced a physical hardware failure where its internal CMOS battery died.
Every time laptop1 loses power, reboots, or undergoes maintenance, its physical hardware clock completely resets to a default manufacturer baseline date.
Proxmox uses a cluster messaging layer (Corosync) to maintain quorum and track node states. Corosync requires strict time synchronization across all nodes. If laptop1 boots up with a clock that drifts from the rest of the cluster by even a few seconds, cluster communication breaks immediately, causing the node to isolate or fence itself.
To bypass this hardware limitation permanently, the system time synchronization service (systemd-timesyncd) must be explicitly forced to aggressively pull the correct time from public network time servers immediately upon network initialization during the boot sequence.
Solution
Step 1: Edit the Time Sync Configuration
Open the network time synchronization configuration file using the nano text editor:
nano /etc/systemd/timesyncd.confLocate the line containing #NTP= or NTP=. Strip away the comment symbol (#) if present and configure it to target fallback public upstream NTP servers (such as Google’s):
[Time]
NTP=time.google.com
FallbackNTP=pool.ntp.org
Save and exit the file (Ctrl + O, Enter, then Ctrl + X).
Step 2: Manually Jump-Start the Clock
Because secure repository handshakes, SSL validations, and initial network sync daemons require a somewhat accurate clock to authenticate, force-set the date manually right now close to the current time:
date -s "2026-06-25 11:40:00"(Verify your clock updated instantly by typing date right after).
Step 3: Install Core Network Time Tools
With an accurate manual time window established, your internet connections to standard repositories will function without certificate validation errors. Install the missing time synchronization tools:
apt-get update && apt-get install -y systemd-timesyncdStep 4: Configure Aggressive Boot-Blocking
To prevent Proxmox from loading heavy cluster services before the time is corrected, configure systemd to freeze the boot sequence until the network interface is active and a successful handshake is locked with the NTP server.
- Tell systemd to rebuild its database of backend definitions:
systemctl daemon-reload- Enable and lock the systemd-time services to activate automatically on every single boot sequence:
systemctl enable systemd-timesyncd
systemctl enable systemd-time-wait-sync.service- Start the engine right now to ensure everything runs perfectly:
systemctl start systemd-timesyncdTo verify that laptop1 is safely protected against future hard reboots, run the following sync status check:
timedatectl statusEnsure your terminal output matches these specific parameters:
- System clock synchronized:
yes - NTP service:
active
Caution
Most of this solution part written by LLM, but it actually work. I don’t know why but as long as it fine i’m cool with it
The CPU Generational Gap
The PC, the 4th-Gen Haswell laptop, and the 3rd-Gen Ivy Bridge laptop all possess different physical CPU instruction sets.
If a Virtual Machine (VM) is created using the default “Host” processor type, it will crash instantly if live-migrated to a machine with a different CPU.
=> All floating VMs have their Processor Type changed to generic baselines like x86-64-v2-AES or kvm64.
3. Storage & Replication
Laptops lack the 10Gbps networking required for enterprise distributed storage like Ceph.
-
Instead, the cluster utilizes local storage (ZFS or LVM-Thin) on each node.
-
High Availability is achieved via ZFS Replication, which syncs VM snapshots across the standard 1Gbps network.
Claude Code
Create a VM with Ubuntu Server as the OS, give it around 8gb of ram.
My PC uses an Intel(R) Xeon(R) CPU E5-2686 v4. For now i allocated 8 cores to test whether there’s any CPU issue when around 3 users run claude code on the same VM.
After that i installed Tailscale on this VM to ssh into it. Basically it’s pretty easy to use.
Access SSH
Wireguard (Failed)
Because the homelab is physically located in Vietnam, routing remote SSH traffic out to international cloud relays (like Cloudflare or Tailscale) introduces unnecessary latency.
To achieve wire-speed, 0ms overhead connections directly to the lab, a WireGuard VPN was deployed.
WireGuard operates over UDP and silently drops unauthenticated packets, meaning international botnets scanning for open ports will see the IP as completely dead.
=> Viettel (my ISP) rotate public IPv4 with no rules so basically this was really a big issue. I could use Cloudflare Tunnel or Amazon Route 53 but that adding unnecessary costs. Also they don’t allow to use other DNS like DuckDNS so that why
By leaning into the raw power of the PC and utilizing the built-in battery redundancy of the laptops, this 3-node cluster transforms spare hardware into an enterprise-grade, highly available playground!
Tailscale
So i use Tailscale, it basic, easy to setup. Everything went smoothly but some how (or i too lazy to make a simple search). I have to set this to its work, my old Tailscale pointed to an old DNS from interface wlan0 make everytime i run sudo tailscale up i lost Internet connection because that interface is no longer exist.
To fix it, run this commmand:
sudo tailscale set --accept-routes=false --accept-dns=falseSimply it remove the DNS. Then it works
Summary
I’m really grateful to my past instructors who were strict with me when i was learning computer networking. Without them this blog would never have happened. Shout out to Sơn for giving me the initial idea of connecting the “nodes” together through basic IP and Subnet splitting.
What i learned today might be a tiny slice of knowledge for you, but the journey and the experience are something i’ll never forget. A homelab is both a hobby and real work, it keeps my passion for the craft alive and replaces the boring, traditional, classic routine of website development with something tied to infrastructure.
When you control almost the whole thing end to end, something you can actually tinker with, it opens up endless opportunities to do all kinds of projects and learn the missing pieces of SWE (Software Engineering) that few schools ever teach.
Thanks everyone for making it this far, wishing you all success in your work.
Comments